hey guys so this is my ender 3 pro from
creality my 3d printer here
um and i just want to show you the main
thing i found
give success when printing with abs as
you can see here i have the matters
hackers
regular abs black and
the only thing i changed on the printer
since i bought it
so i bought their their glass bed that
has this like
i don’t know how it’s advertised but
it’s on their website like a carbon
silica
texture to it so that it helps adhesion
when the print
goes down i don’t use any of those like
adhesive hair sprays or whatever to help
the parts stick
and i’m heating up a part right now so
as you can see the bed is heating up to
110 degrees celsius that’s what this
this thing is maxed out at and
just the bed mod will not give you any
success with
abs so after some trial and error
with what i was trying to find as the
main source of
problem with abs was you can’t have any
air breeze at all touch the part or it
will instantly
lose adhesion to the bed plate and warp
just completely screw the print up
right from the start and once i made
this mod which i’m going to show you
here in a second
now i know there’s a lot better
materials out there such as petg to use
with this printer which is probably what
i’ll switch to next
but the main source that i wanted to use
the printer for was the print automotive
parts
and pla will definitely not handle the
heat
i’ve had pla parts just work in the
sunlight so
i’m going to be using this to make
various automotive parts
i’ve made some center caps for my racing
wheels for the s2000 i’m going to make
some more of that so i have some spares
but they will see rather high
temperatures so the highest
temperature rated material i can get is
my goal so here’s just a quick look at
the one thing i found is the biggest key
thing to need to do to this printer to
allow to print abs successfully even on
an open frame
and that is to tape off the entire
underneath now this is like hvac duct
taping it’s not
foil so it’s a little flexible
but i kind of built an air scoop so that
the intake air
comes in through here and right now the
part fan is off
but from what i found the part fan and
the hot end fan are
both like the same thing they both blow
air like straight down
at the part just because the sheet metal
construction there’s really gaps
everywhere
if you turn the part fan off there’s no
way to turn the hot end fan off
obviously you don’t want to turn that
off but it just continuously blows
air down at the abs print whether you
have the part fan
on or off this hot end fan will always
cool the part
which you don’t want with abs you want
to keep it as hot as possible
on the 110 degrees celsius bed so i kind
of just built an air scoop with some
hvac tape it kind of looks
pretty ghetto but i sealed off the
nozzle
and no air can touch the part now and on
the back side i built a little scoop
that directs the air upward so it kind
of shoots in at the hot end exits the
backside
and flies upward away from the print and
if that’s the case you will never have a
problem with any cool air
hitting your print and causing it to
warp now for bigger parts i’m sure the
edges may
have some negative effects so this is
like the one thing i think you need to
do to even be remotely successful with
printing abs if you don’t have
the air completely blocked off to the
part you will never have a chance on an
open frame printer with abs
now the only negative setup about my
duct there is it kind of does get
temporarily crushed when it zeros out
moving to the left
and it’s still a little bit crushed when
it lays its test strip down
as you can see it kind of had a little
glitch there but now it’s pushing itself
out it’s doing its test strip
and now it’s doing the first layer of
the print
as you can see the abs would generally
pull up at this point already it would
already kind of just peel off and this
would be kind of zigzagging everywhere
and not
doing anything effective but what i do
print with abs they always print with a
brim
so it does maybe 10 11 12 layers of a
brim
around the part that you just snap off
when you’re done with the print and that
helps the adhesion to the bed as well
all right we’ll check back here in a
minute once it gets a little further
along
as you can see we’re about half hour
into the print here
still perfectly no problems
no warping no separation from the plate
temps are maintained at 235 nozzle
and 110 degrees celsius bed temperature
probably the sixth or seventh part i’ve
done an abs with
zero problems i can just walk away from
this thing starting to get pretty
confident there will be no issues
all right so the part just finished i’m
gonna let the bed
cool down to below like 60 degrees
celsius
and then you should be able to just
touch this part and it’ll pop off the
tray
but right now it’s still really hot so
it’s going to be adhered to the tray
don’t try to rip it up yet just let it
cool off be patient
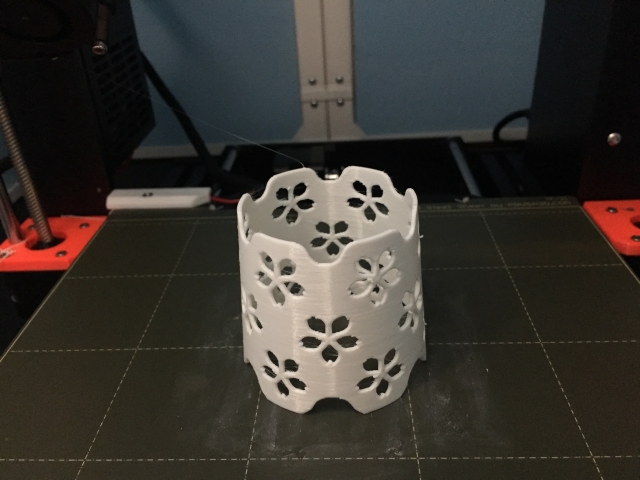
and uh this is printed in 0.28
millimeter layer height which is like
considered a low quality
i don’t really care about the finish on
this part this part is actually a nest
doorbell adapter to offset the angle of
a doorbell
mounting on siding that i designed so
i don’t really care how it looks as long
as it’s just functional
all right so the nozzle is completely
cooled down the room temperature and the
beds around 44.
so that should be plenty cool enough to
grab the part
so go ahead and grab it and didn’t even
stick to the bed because once the bed
cools off
this thing separates itself from the bed
so as you can see
i have my brim printed around the edge
of the part which helps adhesion
and then there’s the part in the middle
all you do is just
break off the brim and there’s your your
part
so thanks guys for watching give this
video a thumbs up if you found it
helpful
let me know if you’ve had a success
printing with this printer or any other
open frame printer with
abs
これは私のEnder 3 Proです。
Creality 私の3Dプリンターです。
そして、その主なものを紹介したいと思います。
私が見つけたもの
として、ABS印刷を成功させる。
ここにあるのは
ハッカー
通常のABSブラックと
プリンターで唯一変更したのは
買ってから
ので、そのガラスベッドを購入しました。
このような
どのように宣伝しているかは知りませんが。
ウェブサイトにはカーボン
シリカ
を、接着しやすくするために、テクスチャーを
プリントの
のようなものは使っていません。
粘着ヘアースプレーなどで
パーツがくっつく
今、パーツを温めているところです。
ご覧の通り、ベッドは熱くなっています。
摂氏110度というのは、この
これは最大値であり
ベッドを改造しただけでは
成功
腹筋の試行錯誤の末に
として、何を探していたかというと
主な原因
を持たせないということでした。
風を当てないと
瞬時に
ベッドプレートとの接着を失い、反る
プリントを完全に失敗させる
を作成しました。
この改造は、これからお見せします。
ここですぐに
もっといい方法があるはずです。
ペットボトルなどの素材は
このプリンターでは、おそらく
次は、このような
しかし、私が使いたいと思ったのは、主に
自動車用プリンターでした。
部品
とプラは絶対に対応できない。
熱
プラ製のパーツは、そのままで使用したことがあります。
太陽光
を作るのに使う予定です。
自動車部品
レース用のセンターキャップを作りました。
S2000のホイールを作る予定です。
予備が欲しいので、もう少し。
が、かなり高い温度で使用することになります。
最高温度なので
温度定格のある材料が必要です。
をざっと見てみました。
一番重要なのは
このプリンターに必要なのは
にもかかわらず、ABSの印刷を成功させることができました。
オープンフレーム
それは、テープで全体を塞ぐことです。
これは空調用のダクトのようなものです。
テーピングは
箔なので、少し柔軟性があります。
しかし、私はエアスクープを作り、その結果
吸気
ここから入ってきて、今は
パーツファンはオフ
しかし、私が調べたところでは、パーツファンと
ホットエンドファンは
どちらも同じようなもので、どちらも吹き出す
まっすぐな空気
板金のため、その部分だけで
隙間だらけの構造
いたるところ
部品ファンをオフにすると、その部品は
ホットエンドファンを停止させる方法
明らかに消したくはないでしょう。
が、ただひたすら吹き付けるだけ。
を吹き付けます。
パートファン
このホットエンドファンは、オンでもオフでも常に
部品を冷却する
腹筋に必要なのは、そのようなことではありません。
できるだけ高温に保つ
110℃のベッドで。
エアスクープを作りました。
空調用テープ
かなりゲテモノですが、密閉しています。
ノズル
で、その部分に空気が触れることはありません。
裏側に小さなスクープを作りました。
空気を上向きにすることで
ホットエンドから噴射され、出口は
裏側
プリントから離れるように上方に飛んでいきます。
そうであるならば、このようなことは決して起こらないでしょう。
冷気の問題
プリントにぶつかると、それが原因で
大きな部品では、反りが発生すると思います。
エッジ
ので、この点は注意が必要です。
のようなものです。
を成功させるために必要なことです。
印刷することができます。
空気を完全に遮断し
の部品では、決してチャンスはありません。
オープンフレームプリンターでAbs
今、私の唯一のネガティブな設定は
ダクトがあるのですが、そのダクトが
ゼロになったときに一時的に潰れる
左方向へ移動
で、まだ少し潰れています。
テストストリップを置くと
見ての通り、ちょっとだけですが
しかし、今は自分自身を押し出しています。
が出てきて、テストストリップをやっているところです。
の最初のレイヤーを作っているところです。
プリント
ご覧のように、腹筋は通常
この時点で既に引き上げられ
もう既に剥がれ落ちているようなもので、これは
ジグザグに動いているようなものです。
とは
をするのは効果的ですが、私の場合は
腹筋で印刷すると、必ず腹筋で印刷されます。
ブリム
で、10 11 12層くらいになります。
ブリム
その部分を折りたたむと
プリントを終了するときに、この方法で
ベッドとの密着性を高めることができます。
では、また後ほど。
もう少ししたら
に沿って
ご覧の通り、30分ほど経過しました。
プリントを開始しました。
まだ完全に問題なし
反りなし、プレートからの剥離なし
ノズル温度は235℃に保たれています。
ベッド温度110度
おそらく6、7個目の部品です。
を行った。
問題なし……このまま帰れる
を、かなり実感できるようになりました。
問題ないだろうという確信
さて、今終わったところです。
ベッドを
60度くらいまで冷やして
摂氏
そして、あなたはちょうど
この部品に触れたら、飛び出しますよ。
トレイ
しかし、今はまだ本当に熱く、そのため
トレイに付着しています。
まだ破ろうとしないでください。
クーリングオフ・ビーイング・コンパチブル
これは0.28で印刷されています。
ミリメートルで印刷されており、これは
低品質とされる
仕上げはあまり気にしません。
この部品は、実はネスト
の角度をオフセットするためのドアベルアダプターです。
ドアベル
サイディングへの取り付けは、私が設計したものです。
見た目はどうでもいいんです。
機能的であれば
ノズルは完全に
室温が下がり
ベッドは約44
で、これなら十分に涼しいはずです。
パーツをつかむ
ということで、さっそく掴んでみたのですが、これがなかなか。
ベッドにくっつくのは、ベッドが
冷える
これは、ベッドと分離します。
ご覧の通り
つばをプリントしています。
接着を助けるパーツの
そして、真ん中のパーツ。
あなたはただ
つばを折って、その上に、あなたの
パーツ
ご覧いただきありがとうございます。
このビデオをご覧になった方は、親指を立ててください。
役に立つ
成功したら教えてください。
このプリンター、または他のプリンターで印刷する
オープンフレームプリンター
腹筋
■おすすめ記事
・初心者でもおすすめ安くて使いやすい3Dプリンタ「ender3 」の紹介
・資格取得のその先… まず第一に「資格」自体取得したところであまり意味をなしません。資格取得はゴールではなく稼ぐための手段なのです
・学歴・資金・資格なしでも人生を一発逆転できる方法とは
・仕事で成果を上げるために必要な2つの「仕事の構造化」と「仕事のシステム化」について
・仕事が楽しくなる!!! 仕事を効率的にこなし、楽しくやりがいをもつために必要なスキルとは
・Python 3 入門 + 応用 +アメリカのシリコンバレー流コードスタイルを学ぶオンライン講座
・pythonの初心者入門は何から始めればよいのか?? pythonに関しての情報一覧


コメント